Construction
|
Structure:
The structure of the box itself is made out of foam board, a lightweight, durable, and heat resistant material. From these slabs, an 8 by 11 by 4 1/2 inch box was stitched together, the creation slowly coming to life under the careful guidance of knife and glue. After the box was finished, a layer of fiberglass insulation was carefully laid down in the interior, and the next few minutes were spent just as carefully removing glass shards from my hands. After the insulation was secure, a shiny Mylar rescue blanket was taped over, giving the box its final layer of insulation. Around the exterior of the box, layers upon layer of aluminum tape were carefully laid down, giving the box its sleek and futuristic look. Now that we had it all nice and pretty, we immediately set about cutting a hole in it to put our PVC pipe through. Once that was set, we attached fittings, a straightened paper clip through the PVC, and prayed that it wouldn't come flying off. As a final touch, the name and address of the University of Northern Colorado was written all over the sides, in the event that the box was found by someone else after pickup. Oh, and an American Flag too for good measure. You know, just in case someone thought there was a surprise communist invasion or something. |
Electronics:
What's the fun in sending up an empty box? None at all of course! That's why we made sure our payload box was stuffed full of all the latest high tech gear that our extremely limited budget could buy. Front and center was the heater. Since they don't make actual heaters that small and lightweight, we had to make our own. We accomplished this miraculous feat by wiring a pair of four 9 volt batteries in series to a set of six resistors. When current flowed through the resistors, it produced heat as a by product, which was just enough to prevent our whole system from freezing solid. Trust me, it gets really cold up there. Our next largest component was the Geiger counter, which is what we could be using to measure the muon flux, since muons are a form of ionizing radiation. In addition to the Geiger counter, we also had sensors to record the pressure and temperature, so that we could calculate the exact altitude of our tiny little payload. All of this information was wired to an Sparkfun Arduino circuit board, where it was stored on a removable SD card. Believe me when I say that we put cushioning around that card. It was the only thing we actually cared about making back to the ground in one piece. |
Testing the Box
Before we could explore the upper atmosphere, we had to make sure that the box could actually handle the stress. It can get really harsh up there, with brutal turbulence, temperatures as low as 80 degrees Celsius, and not to mention the inevitable fall that the box always experiences when the balloon pops. But don't fear, for we have planned and executed every single worst-case scenario here on the ground!
Whip Test
First up, we had the whip test, which involved us flinging the box around our heads like a flail by the flight string. This test was designed to simulate the extreme turbulence that the box would face as it was buffered by all the wind. When we first tried it, the box flew off and slammed into the ground. But since you learn from your mistakes, we stuck a paper clip trough the PVC pipe, which you can view in slide three of the slideshow above. At least it won't happen a second time.
|
Drop Test
After the whip test, we performed the drop test, which is probably the simplest test on here. All you have to do is take the payload up on top of a four story building, and throw it off. Quick, simple, and we survived with only minimum damage. Huzzah!
|
Cooler Test
Just because there's a whole lot of sunlight up at 30 kilometers doesn't mean that it's warm. Temperatures can drop as low as -80 degrees Celsius, and electronics really don't like to work when it's that cold out. I probably wouldn't either, so I can't really blame them. But if the batteries stop working, we won't be able to log any of the data from the Geiger counter, so we needed to be sure that our brave little heater was up to the task.
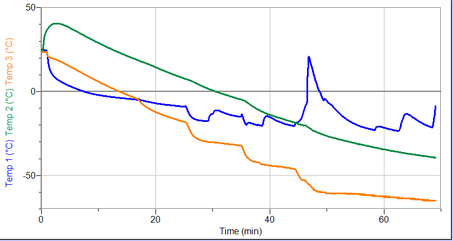
For this set up, we placed the payload box, containing the heater of course, inside of a secure styrofoam cooler added some liquid nitrogen to the mix, after making sure that the payload box wasn't actually touching the liquid first. Liquid nitrogen has a boiling point of -128 degrees Celsius, so it may have been a tad overkill in terms of testing for the heater. But look at the pretty graph it made!
For this set up, we placed the payload box, containing the heater of course, inside of a secure styrofoam cooler added some liquid nitrogen to the mix, after making sure that the payload box wasn't actually touching the liquid first. Liquid nitrogen has a boiling point of -128 degrees Celsius, so it may have been a tad overkill in terms of testing for the heater. But look at the pretty graph it made!
|
This is the data that was taken by three temperature probes that we placed inside the cooler as well. The green line was from a probe right next the heater, the orange line was inside the payload, but opposite the heater, and the blue line was outside the payload all together. And encase you're wondering, the massive spike in the blue probe was due to one of us accidentally touching it. Whoops.
Although temperatures droped well below -50 degrees in some parts of the box, the test was still a huge success. Remember, the conditions inside the cooler were much worse than they would be during weather balloon launch. |
